WordPress E-commerce: How to set-up a Profitable Online Store with WooCommerce
Are you eager to establish a thriving online store and tap into the world of e-commerce? Then, look no further than WordPress and WooCommerce, a dynamic duo that can turn your dreams into reality.
In this comprehensive guide, we’ll walk you through creating a stunning online store using WooCommerce, one of WordPress’s most popular e-commerce plugins.

WooCommerce
Here's How You Can Set Up Your Online Store with WooCommerce and WordPress
Before diving into the technical aspects, it’s essential to understand why WordPress and WooCommerce are a winning combination for your e-Commerce venture.
1. User-Friendly
WordPress is known for its user-friendly interface, making it accessible to beginners and seasoned website owners. WooCommerce seamlessly integrates with WordPress, adding e-commerce functionality without complicating the platform.
2. Flexibility
With thousands of WordPress e-commerce plugins and themes, you can customize your online store to suit your brand’s unique needs and style. Whether you’re selling physical products, digital downloads, or services, WordPress and WooCommerce offer flexibility and scalability.
3. Cost-Effective
WordPress and WooCommerce are open-source and free to use. You’ll only need to invest in web hosting, a domain name, and premium themes or plugins for additional features.
4. Robust e-commerce Features
WooCommerce provides an extensive array of features, including inventory management, secure payments, shipping options, and more. You can set up your online store with all the necessary tools for a successful e-commerce venture.
Here is a step-by-step guide to how to create an online store with WooCommerce
Step-by-Step Tutorial for WooCommerce
Step 1: Setting Up WordPress

WordPress
The first step is to set up WordPress by following these simple steps
- Choose a Hosting Provider: Select a reputable hosting provider that meets your needs and budget. Some of the most popular options are Bluehost, SiteGround, and HostGator.
- Domain Name: Register a domain name that represents your brand and niche.
- Install WordPress: Usually, hosting providers provide one-click WordPress installation. Just follow the simple on-screen instructions to set up your WordPress site.
Step 2: Installing WooCommerce
Next, add the WooCommerce plugin to your site.
- Log in to Your WordPress Dashboard.
- Navigate to Plugins > Add New.
- Search for “WooCommerce” and click “Install Now.”
- After installation, click “Activate.”
WooCommerce will guide you through the initial setup process, including configuring your store’s location, currency, and payment options.
Step 3: Choosing an e-commerce Theme

Selecting the right theme is crucial for the look and functionality of your online store. Here are some pointers when searching for a suitable WordPress e-commerce theme:
- Look for responsive designs to ensure your store looks great on all devices.
- Check for compatibility with WooCommerce to avoid compatibility issues.
- Choose a theme that aligns with your brand’s style.
- Ensure the theme provides essential e-commerce features like product listings, shopping cart functionality, and product pages.
Some popular WordPress e-commerce free themes include Astra, OceanWP, and Storefront.
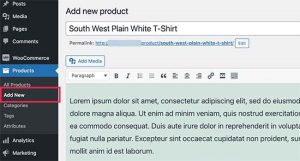
Step 4: Adding Products and Inventory Management

- Log in to your WordPress Dashboard.
- Go to WooCommerce > Products > Select Add New.
- Fill in product details like title, description, price, and images.
- Set up product categories and tags for better organization.
- Configure product attributes like size, color, or variations if applicable.
WooCommerce also offers inventory management features, so you can keep track of stock levels and set up low-stock notifications.
Step 5: Configuring Payment and Shipping Options
To make your online store fully functional, you need to set up payment and shipping options.
- Payment Gateways: WooCommerce supports payment gateways like PayPal, Stripe, and credit card payments. Configure your preferred payment methods in WooCommerce > Settings > Payments.
- Shipping: Define shipping zones, rates, and methods in WooCommerce > Settings > Shipping.
Step 6: Enhancing Your WordPress e-commerce Store
To take your online store to the next level, consider these additional steps.
- Install e-commerce Plugins: Explore and install additional WooCommerce plugins to add features like reviews, SEO optimization, email marketing, and more.
- Optimize for SEO: Use an SEO plugin like Yoast SEO to improve your store’s visibility in search engines.
- Marketing and Promotion: Plan your marketing strategy, including email marketing, social media, and content marketing, to drive traffic and sales.
- Regular Maintenance: Keep your WordPress and WooCommerce plugins and themes up to date to ensure security and performance.
By following these steps, you’ll be well on your way to building an online store with WooCommerce and WordPress. Remember, the key to e-commerce success is offering quality products, a user-friendly experience, and effective marketing strategies. Happy selling!
V2Solutions is your trusted digital transformation partner, dedicated to creating disruptive content that aligns with industry trends. Our strategic team crafts tailor-made solutions to elevate your brand’s relevance and success. We set new standards, stay ahead of industry shifts, and ensure your brand thrives in the ever-evolving digital landscape.